Are you ready to transform your look with a stylish shaggy bob but unsure where to start? The shaggy bob has become one of the most sought-after hairstyles in recent years, thanks to its effortless charm and versatility. Whether you're a fan of DIY haircuts or just looking to save a trip to the salon, mastering the DIY shaggy bob is entirely possible with the right guidance. In this comprehensive guide, we’ll walk you through everything you need to know to achieve this chic hairstyle at home.
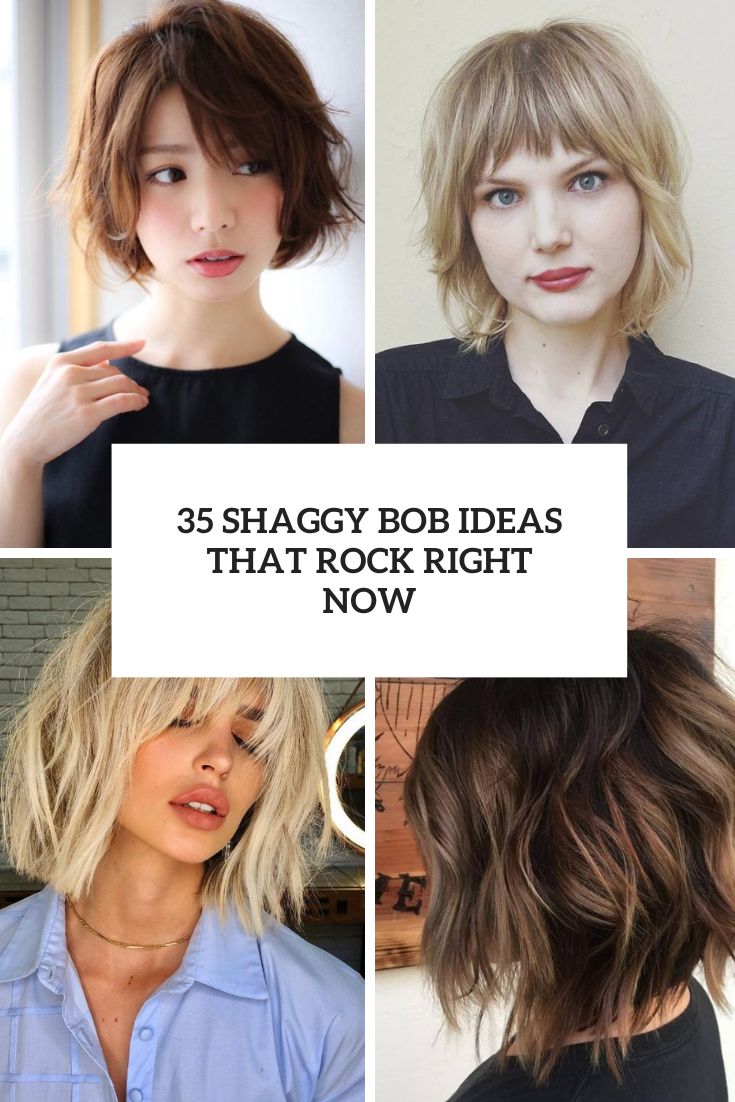
The shaggy bob is more than just a haircut; it’s a statement. Characterized by its layered texture and tousled finish, this style is perfect for those who want to look polished without appearing overly done. It works for all hair types and face shapes, making it a universally flattering choice. With its growing popularity, many people are eager to learn how to recreate this look themselves. However, achieving the perfect shaggy bob requires understanding the right techniques, tools, and maintenance tips.
In this article, we’ll cover everything from preparation to execution, ensuring you have the confidence to tackle this DIY project. You’ll also learn about essential tools, styling tips, and how to maintain your new haircut. Whether you’re a beginner or have some experience with haircuts, this guide is designed to provide clear, actionable steps to help you succeed. So grab your scissors, and let’s dive into the world of effortless style!
Read also:Kannada Movierulz Max Your Ultimate Guide To Streaming Kannada Movies Online
Table of Contents
Understanding the Shaggy Bob
Before diving into the process of cutting your own shaggy bob, it’s essential to understand what makes this hairstyle unique. The shaggy bob is a hybrid of two iconic styles: the bob and the shag. The bob provides structure and length, while the shag introduces layers and texture, creating a laid-back yet sophisticated look. This combination makes the shaggy bob perfect for those who want a low-maintenance style that still looks polished.
One of the reasons the shaggy bob has gained popularity is its adaptability. Whether you have straight, wavy, or curly hair, this style can be tailored to suit your texture. Additionally, it works well for various face shapes, including round, oval, and square. The layers add volume and movement, making it an excellent choice for fine or thin hair, while the length ensures it remains practical and easy to manage.
Essential Tools and Preparation
Having the right tools is crucial for achieving a professional-looking DIY shaggy bob. Here’s a list of items you’ll need:
- Sharp scissors: Dull scissors can cause split ends and uneven cuts.
- Comb: A fine-tooth comb helps with precise sectioning.
- Clips: Use hair clips to keep sections separated.
- Spray bottle: Keep your hair damp for better control while cutting.
- Mirror: A handheld mirror is useful for checking the back of your head.
Before you begin, wash and dry your hair to ensure it’s clean and free of tangles. It’s best to cut your hair when it’s slightly damp, as this allows for more accurate results. Avoid cutting your hair when it’s soaking wet, as it will shrink as it dries.
Step-by-Step DIY Guide
Sectioning Your Hair
Proper sectioning is the foundation of a successful haircut. Start by dividing your hair into four main sections: the crown, the sides, the back, and the bangs (if applicable). Use clips to secure each section and work on one at a time. This method ensures that you maintain symmetry and avoid uneven cuts.
Cutting the Back Section
Begin with the back section, as this will serve as the guide for the rest of your haircut. Take a small vertical section of hair from the middle of the back and hold it straight out from your head. Cut it to your desired length, keeping the scissors parallel to the floor. Use this section as a reference for the rest of the back, working your way outward.
Read also:Simon Cowell Funeral A Tribute To A Legendary Life
Styling Tips for Effortless Look
Once your shaggy bob is cut, it’s time to style it for that effortless, tousled finish. Start by applying a volumizing mousse or texturizing spray to damp hair. Blow-dry your hair using a round brush to add body and movement. For a more natural look, scrunch your hair with your hands while drying.
To enhance the texture, use a flat iron or curling wand to create loose waves. Finish with a lightweight hairspray or texturizing paste to maintain the style without weighing it down. These simple steps will help you achieve the perfect balance of structure and carefree charm.
Maintaining Your Shaggy Bob
Regular maintenance is key to keeping your shaggy bob looking fresh. Trim your hair every 6-8 weeks to prevent split ends and maintain the shape. Invest in high-quality hair care products, such as sulfate-free shampoos and conditioners, to keep your hair healthy and shiny.
Additionally, protect your hair from heat damage by using a heat protectant spray before styling. If you spend a lot of time outdoors, consider using products with UV protection to shield your hair from sun damage.
Common Mistakes to Avoid
Even with the best intentions, mistakes can happen when cutting your own hair. One common error is cutting too much hair at once. Always start with small snips and check your progress frequently. Another mistake is neglecting to consider your hair’s natural texture and growth pattern, which can lead to an uneven finish.
To avoid these pitfalls, take your time and follow the steps carefully. If you’re unsure about a particular section, consult online tutorials or seek advice from a professional hairstylist.
Frequently Asked Questions
Q: Can I achieve a shaggy bob on curly hair?
A: Absolutely! The shaggy bob works beautifully on curly hair, as the layers enhance your natural texture and add volume.
Q: How long does it take to cut a DIY shaggy bob?
A: On average, it takes about 1-2 hours, depending on your experience level and the length of your hair.
Inspiration and Trends
The shaggy bob has been embraced by celebrities and influencers alike, making it a timeless trend. From Zendaya to Hailey Bieber, many stars have sported this style on red carpets and social media. For inspiration, browse fashion magazines or Pinterest boards to discover variations of the shaggy bob that suit your personality and lifestyle.
Conclusion
Mastering the DIY shaggy bob is an empowering way to refresh your look and express your personal style. With the right tools, preparation, and techniques, you can achieve a salon-worthy haircut from the comfort of your home. Remember to maintain your shaggy bob regularly and experiment with different styling methods to keep it looking fresh.
If you found this guide helpful, don’t forget to share it with your friends and leave a comment below with your thoughts or questions. For more hair care tips and tutorials, explore our other articles on effortless style and DIY beauty hacks!