Setting up a remote IoT VPC network with Raspberry Pi using free AWS resources is an exciting and cost-effective way to build a scalable, secure, and efficient IoT infrastructure. With the growing demand for IoT solutions in industries like agriculture, healthcare, and smart homes, leveraging cloud platforms like Amazon Web Services (AWS) can provide significant advantages. This guide will walk you through the process step-by-step, ensuring that even beginners can follow along without breaking the bank.
Remote IoT networks are essential for connecting devices over long distances while maintaining security and reliability. By combining the power of Raspberry Pi, a versatile and affordable single-board computer, with AWS's robust cloud infrastructure, you can create a highly functional IoT system. AWS offers a free tier that includes sufficient resources to get started, making it an ideal choice for hobbyists, students, and small businesses.
This article will cover everything you need to know, from setting up your Raspberry Pi to configuring AWS services like VPC, EC2, and IoT Core. We'll also discuss best practices for securing your network and optimizing performance. By the end of this guide, you'll have a fully functional IoT network that can be accessed remotely, enabling you to monitor and control your devices from anywhere in the world.
Read also:Free Hd Movies And Shows Hdhub4u Latest Releases
Table of Contents
- Introduction to IoT and AWS
- Setting Up Raspberry Pi
- Creating a VPC on AWS
- Configuring EC2 Instance
- Connecting Raspberry Pi to AWS
- Setting Up AWS IoT Core
- Securing Your IoT Network
- Optimizing Performance
- Troubleshooting Common Issues
- Conclusion and Next Steps
Introduction to IoT and AWS
IoT, or the Internet of Things, refers to the network of physical devices embedded with sensors, software, and connectivity that enable them to exchange data over the internet. These devices can range from simple sensors to complex industrial machinery. IoT systems are transforming industries by providing real-time data, enabling automation, and improving decision-making processes.
AWS, or Amazon Web Services, is a comprehensive cloud platform offering a wide range of services, including computing, storage, and networking. AWS's IoT services, such as IoT Core, provide tools to connect, monitor, and manage IoT devices securely. AWS's free tier allows users to experiment with these services without incurring costs, making it an excellent choice for beginners and small-scale projects.
Combining IoT with AWS offers several advantages, including scalability, security, and ease of integration. AWS's global infrastructure ensures low latency and high availability, which are critical for IoT applications. Additionally, AWS provides robust security features to protect sensitive data and devices from cyber threats.
Setting Up Raspberry Pi
Raspberry Pi is a small, affordable, and versatile single-board computer that serves as an ideal platform for IoT projects. Before you begin, ensure you have the following components:
- Raspberry Pi (preferably Raspberry Pi 4)
- MicroSD card (minimum 16GB)
- Power supply
- Ethernet cable or Wi-Fi adapter
- Keyboard, mouse, and monitor (optional for initial setup)
Installing Raspberry Pi OS
To set up your Raspberry Pi, start by downloading the Raspberry Pi OS from the official website. Follow these steps:
- Download the Raspberry Pi Imager tool and install it on your computer.
- Insert the MicroSD card into your computer.
- Open the Raspberry Pi Imager and select the Raspberry Pi OS (32-bit) option.
- Choose your MicroSD card as the storage device.
- Click "Write" to flash the OS onto the MicroSD card.
Configuring Raspberry Pi
Once the OS is installed, insert the MicroSD card into your Raspberry Pi and power it on. Follow these steps to configure your device:
Read also:Fry99com Your Ultimate Online Shopping Destination
- Connect your Raspberry Pi to a monitor, keyboard, and mouse.
- Follow the on-screen instructions to complete the initial setup.
- Enable SSH by running the command
sudo raspi-configand navigating to "Interfacing Options." - Update the system using
sudo apt update && sudo apt upgrade.
Creating a VPC on AWS
A Virtual Private Cloud (VPC) is a virtual network dedicated to your AWS account. It allows you to launch AWS resources in a defined virtual network, providing isolation and control over your environment. Follow these steps to create a VPC:
- Log in to your AWS Management Console.
- Navigate to the VPC Dashboard and click "Create VPC."
- Specify the IP address range for your VPC (e.g., 10.0.0.0/16).
- Configure subnets, route tables, and internet gateways as needed.
- Review and create the VPC.
Configuring EC2 Instance
An EC2 instance is a virtual server in AWS's Elastic Compute Cloud. It serves as the backbone of your IoT network, hosting applications and managing communication between devices. Follow these steps to configure an EC2 instance:
- In the AWS Management Console, navigate to the EC2 Dashboard.
- Click "Launch Instance" and select an Amazon Machine Image (AMI).
- Choose an instance type (e.g., t2.micro for the free tier).
- Configure instance details, including network settings and IAM roles.
- Add storage and configure security groups to allow necessary traffic.
- Review and launch the instance.
Connecting Raspberry Pi to AWS
Once your VPC and EC2 instance are set up, the next step is to connect your Raspberry Pi to AWS. This involves configuring the Raspberry Pi to communicate with the EC2 instance securely. Follow these steps:
- Install the AWS CLI on your Raspberry Pi using
sudo apt install awscli. - Configure the CLI by running
aws configureand entering your AWS credentials. - Use SSH to connect to your EC2 instance from the Raspberry Pi.
- Test the connection by sending a simple command, such as
ping.
Setting Up AWS IoT Core
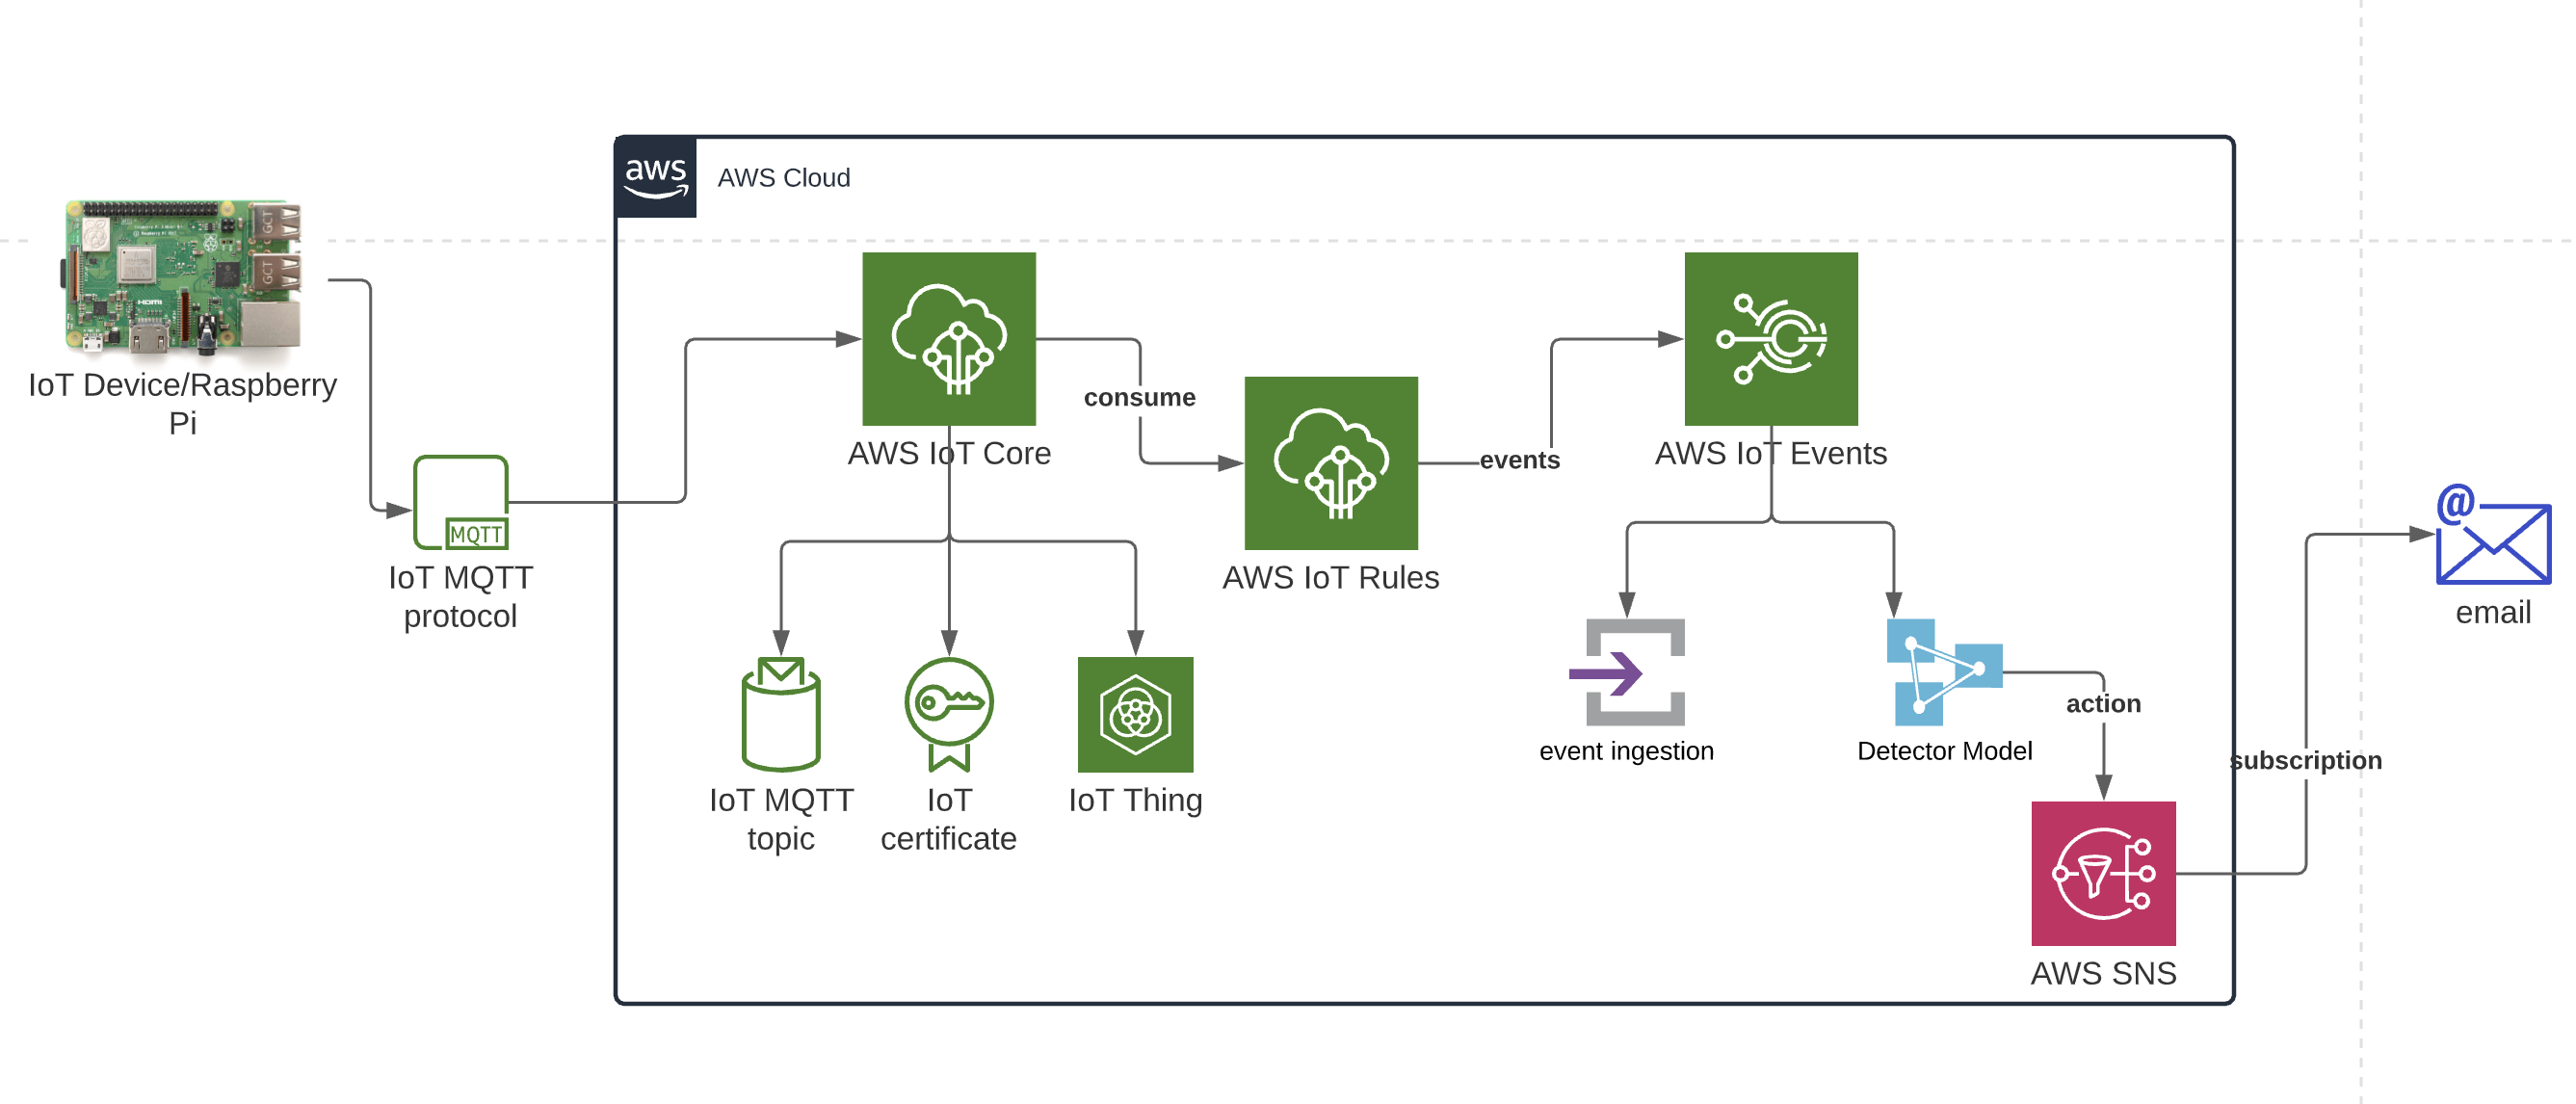
AWS IoT Core is a managed cloud service that lets connected devices interact with cloud applications and other devices securely. Follow these steps to set up IoT Core:
- Navigate to the AWS IoT Core Dashboard in the AWS Management Console.
- Create a thing (device) and register it with IoT Core.
- Generate security certificates and attach policies to the device.
- Install the AWS IoT SDK on your Raspberry Pi and configure it to connect to IoT Core.
Securing Your IoT Network
Security is a critical aspect of any IoT network. Follow these best practices to secure your setup:
- Use strong passwords and enable multi-factor authentication for AWS accounts.
- Encrypt data in transit using TLS and data at rest using AWS Key Management Service (KMS).
- Regularly update software and firmware on your Raspberry Pi and EC2 instance.
- Monitor logs and set up alerts for suspicious activities using AWS CloudWatch.
Optimizing Performance
To ensure your IoT network performs optimally, consider the following tips:
- Use AWS Auto Scaling to handle varying workloads efficiently.
- Optimize data storage by using AWS S3 for large datasets and DynamoDB for structured data.
- Implement caching mechanisms to reduce latency and improve response times.
- Regularly analyze performance metrics using AWS CloudWatch and adjust configurations as needed.
Troubleshooting Common Issues
While setting up your IoT network, you may encounter some common issues. Here are solutions to address them:
- Connection Issues: Verify network settings, security groups, and firewall rules.
- Device Authentication Failures: Double-check certificates and policies in IoT Core.
- High Latency: Optimize your VPC configuration and use AWS Global Accelerator if necessary.
Conclusion and Next Steps
Setting up a remote IoT VPC network with Raspberry Pi using free AWS resources is a rewarding project that combines hardware and cloud computing. By following this guide, you've learned how to configure Raspberry Pi, create a VPC, launch an EC2 instance, and connect everything using AWS IoT Core. You've also explored best practices for securing and optimizing your network.
Now that you have a functional IoT network, consider expanding it by adding more devices or integrating advanced AWS services like Lambda and Machine Learning. Share your experience in the comments below, and don't hesitate to reach out if you have questions. Happy building!